
🔥 How to Authenticate Jina AI in n8n Workflows: A Step-by-Step Guide 🚀
🔑 Learn how to authenticate Jina AI in your n8n workflows with this easy step-by-step guide! From obtaining your Jina AI API key 🏆 to configuring the n8n HTTP Request node ⚙️, this tutorial helps students, hobbyists, and automation enthusiasts integrate Jina AI seamlessly. 🚀💡


Integrating Jina AI into your n8n workflows can enhance automation tasks like web scraping and data processing. Here's a detailed guide to help you authenticate and configure the integration:
Obtain Your Jina AI API Key 🔑
You can use the Jina API without an API key, but in order to get reliable results you should at least use a free API key. To obtain your Jina API key follow these steps:
- Sign Up: Visit the Jina AI website and create an account.
- Access the API Dashboard: After logging in, navigate to the API Dashboard.
- Create an API Key: In the dashboard, click on 'Create API Key' to generate a new key. Each new key provides one million free tokens.
Configure the n8n HTTP Request Node for Jina AI Integration 🚀
With your API key ready, integrate Jina AI into your n8n workflows by configuring the HTTP Request node:
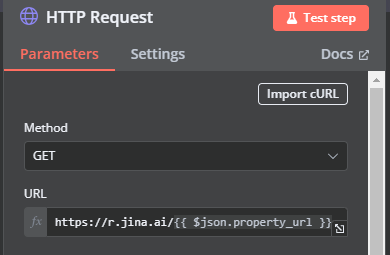
- Add the HTTP Request Node: In your n8n workflow, drag and drop the HTTP Request node.
- Set Request Method and URL:
- Method: Select
GET. - URL: Enter the specific Jina AI API endpoint you intend to use, such as the Reader API.
- Method: Select
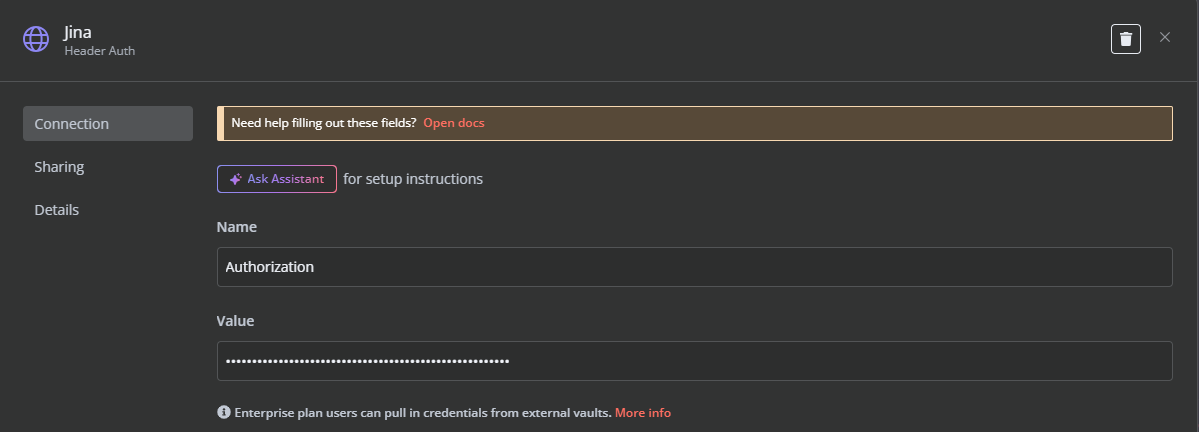
- Configure Authentication:
- Authentication Method: Set to 'Header Auth'.
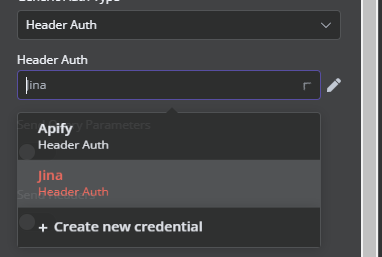
- Header Parameters:
- Name:
Authorization - Value:
Bearer YOUR_API_KEY
- Name:
This setup ensures that your API key is securely included in the request headers.
Test and Refine Your Workflow 🧪
After configuring the node:
- Run Tests: Execute the workflow with sample data to ensure it functions as intended.
- Debug: Utilize n8n's debugging tools to identify and resolve any issues.
- Optimize: Adjust parameters and configurations to enhance performance and meet your specific needs.
Happy automating! 🤖